Swab Sampling, Rinse Sampling and Analytical Methods
Article Series Navigation
← Part 1: Cleaning Validation in Pharmaceutical Manufacturing – Complete Beginner’s Guide
← Part 2: Risk Assessment and Acceptance Criteria in Cleaning Validation
← Part 3A: Validation Planning and Cleaning Validation Protocol
Current: Part 3B – Sampling and Analytical Methods
Next: Part 3C – Documentation, Failure Investigation and Best Practices
Table of Contents
- Introduction
- Importance of Sampling
- Swab Sampling
- Rinse Sampling
- Worst-Case Sampling Locations
- Recovery Studies
- Recovery Factor Calculation
- Analytical Methods
- TOC Analysis
- HPLC Analysis
- Conductivity Testing
- Microbial Testing
- Worked Examples
- Sampling Flow Diagram
- Best Practices
- Common Mistakes
- Key Takeaways
- Continue to Part 3C
Introduction
A scientifically designed Cleaning Validation Protocol is only as effective as the sampling and analytical methods used to verify cleaning effectiveness. Even if equipment appears visually clean, invisible residues of active pharmaceutical ingredients (APIs), detergents, or microorganisms may remain on product-contact surfaces.
Regulatory agencies such as the US FDA, EMA, WHO-GMP, MHRA, and PIC/S expect manufacturers to demonstrate that sampling methods are representative, reproducible, and capable of detecting residues at predefined acceptance limits.
Sampling is therefore the bridge between cleaning execution and analytical verification.
Why Sampling is Critical
Sampling provides documented evidence that the cleaning procedure has successfully removed contaminants from manufacturing equipment.
The objectives are to:
- Verify residue removal.
- Confirm compliance with HBEL/PDE-based acceptance criteria.
- Demonstrate reproducibility of cleaning.
- Detect residues in difficult-to-clean areas.
- Provide data for regulatory inspections.
An inadequate sampling plan can lead to false conclusions and failed inspections.
Swab Sampling
What is Swab Sampling?
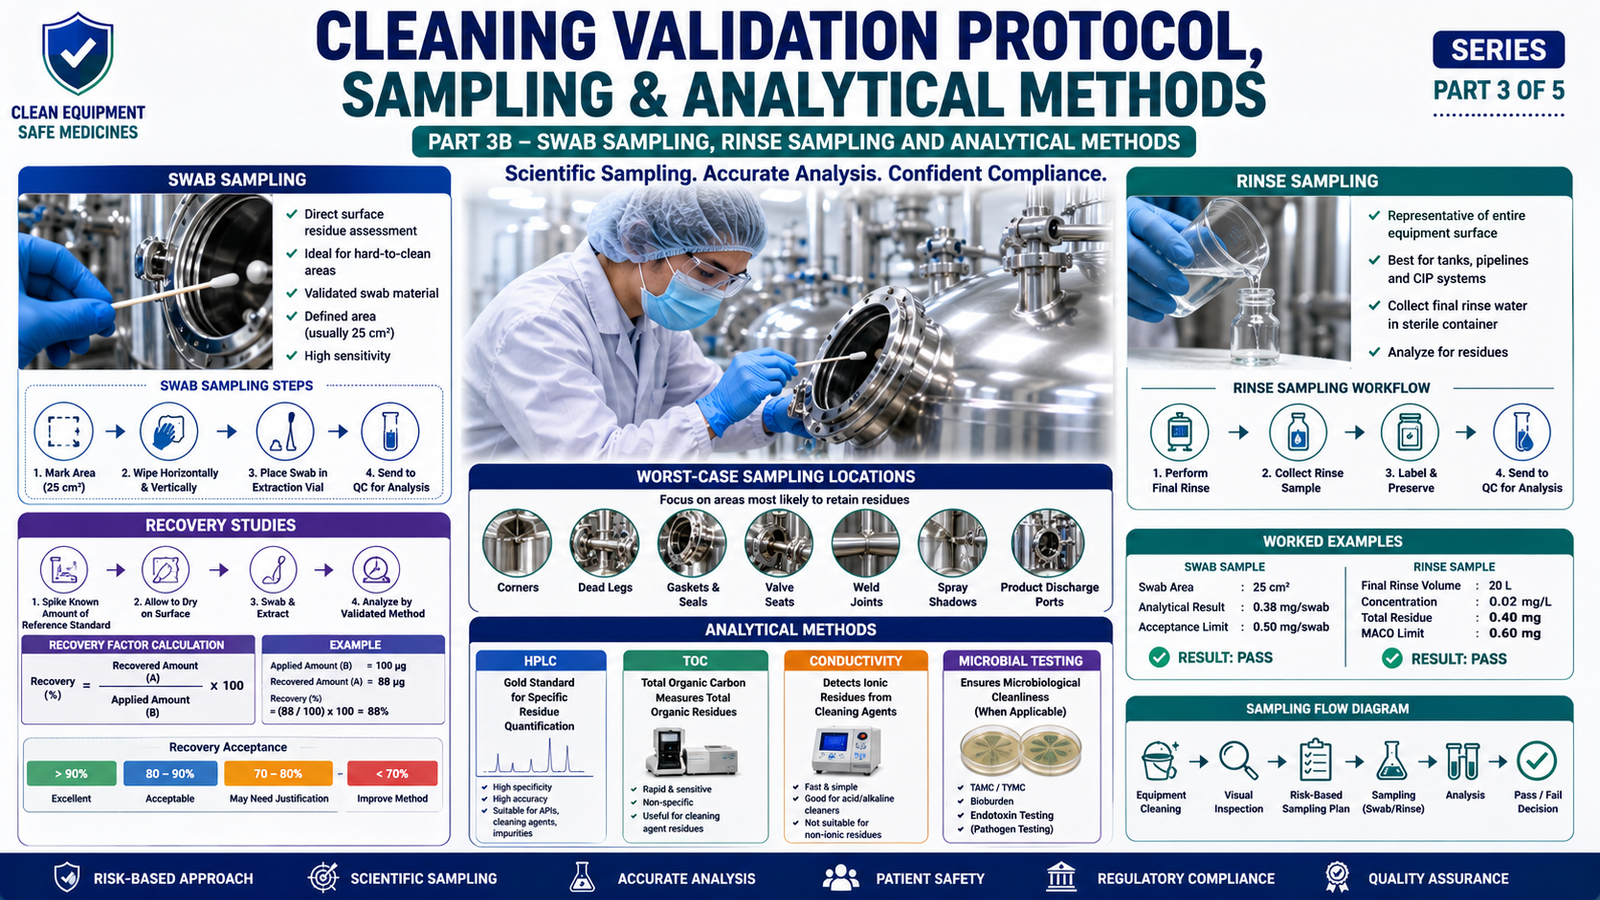
Swab sampling involves wiping a defined surface area using a validated swab to collect chemical or microbial residues.
It is the most widely accepted sampling technique because it directly measures residues on equipment surfaces.
Advantages
- Direct surface assessment
- High analytical sensitivity
- Suitable for difficult-to-clean locations
- Applicable for API and detergent residues
- Preferred by most regulatory agencies
Limitations
- Limited sampling area
- Operator-dependent technique
- Recovery efficiency must be established
- Difficult for long pipelines and closed systems
Typical Swab Materials
- Polyester
- Cotton
- Foam
- Microfiber
- Low-lint synthetic swabs
The swab material must be compatible with both the residue and extraction solvent.
Standard Swab Sampling Procedure
- Wear appropriate PPE.
- Prepare the pre-moistened validated swab.
- Mark the sampling area (commonly 25 cm²).
- Wipe horizontally.
- Wipe vertically.
- Wipe diagonally.
- Rotate the swab during collection.
- Place the swab into a labeled extraction vial.
- Add extraction solvent.
- Send the sample to QC for analysis.
Consistency in sampling technique is essential for reliable results.
Rinse Sampling
What is Rinse Sampling?
Rinse sampling evaluates residues remaining after the final rinse of cleaned equipment by analyzing the rinse solution.
It is especially useful for equipment where swabbing is impractical.
Suitable Applications
- Clean-in-Place (CIP) systems
- Transfer pipelines
- Large reactors
- Tanks
- Fluid bed dryers
- Closed systems
Advantages
- Covers the entire equipment surface
- Simple to perform
- Suitable for inaccessible areas
- Useful for automated cleaning systems
Limitations
- Residue location cannot be identified.
- Dilution may reduce sensitivity.
- Recovery studies are essential.
- Less effective for localized contamination.
Swab Sampling vs. Rinse Sampling
| Parameter | Swab Sampling | Rinse Sampling |
|---|---|---|
| Surface Assessment | Direct | Indirect |
| Sampling Area | Defined area | Entire equipment |
| Difficult-to-Reach Areas | Limited | Excellent |
| Detection Sensitivity | High | Moderate |
| Regulatory Preference | Preferred | Acceptable when justified |
| CIP Systems | Limited | Ideal |
Many companies use a combination of both techniques for comprehensive evaluation.
Worst-Case Sampling Locations
Sampling should focus on areas most likely to retain residues.
Typical worst-case locations include:
- Equipment corners
- Dead legs
- Gaskets
- Seals
- Valve seats
- Spray shadows
- Weld joints
- Mixing blades
- Product discharge ports
- Hopper outlets
- Feed frames
- Punches and dies (tablet presses)
These locations should be identified during the risk assessment and clearly documented in the protocol.
Sampling Location Selection Criteria
| Factor | Higher Risk |
|---|---|
| Product retention | High |
| Accessibility | Poor |
| Surface finish | Rough |
| Cleaning difficulty | High |
| Manual cleaning | Required |
| Residue history | Previous failures |
Sampling plans should include a combination of worst-case and representative locations.
Recovery Studies
What is a Recovery Study?
Recovery studies determine how efficiently a sampling method removes residues from equipment surfaces.
No sampling method recovers 100% of residues. Therefore, the measured result must account for recovery efficiency.
Regulators expect recovery studies to be performed before cleaning validation.
Recovery Study Process
- Apply a known quantity of residue to a representative surface.
- Allow the residue to dry.
- Perform swab sampling.
- Extract the residue.
- Analyze using the validated analytical method.
- Calculate the recovery percentage.
Recovery Factor Calculation
Formula
Recovery (%)=Applied AmountRecovered Amount×100
Worked Example
Applied residue
= 100 µg
Recovered residue
= 88 µg
Recovery
= (88 ÷ 100) × 100
= 88%
This recovery factor is then incorporated into the final acceptance calculations.
Typical Recovery Acceptance
| Recovery | Assessment |
|---|---|
| >90% | Excellent |
| 80–90% | Acceptable |
| 70–80% | May require justification |
| <70% | Improvement recommended |
Many pharmaceutical companies target recovery values of 80% or higher.
Analytical Methods
After sampling, residues must be quantified using validated analytical techniques.
The selected method depends on:
- Residue type
- Detection limit
- Specificity
- Sensitivity
- Equipment type
- Cleaning agent
- Regulatory expectations
Total Organic Carbon (TOC)
Principle
TOC measures the total carbon present from organic compounds.
It is widely used for:
- Cleaning verification
- Non-specific residue detection
- Cleaning agent evaluation
- Water system monitoring
Advantages
- Rapid analysis
- Highly sensitive
- Suitable for multiple products
- Minimal sample preparation
Limitations
- Cannot identify individual compounds.
- Detects all organic carbon, including background contamination.
High Performance Liquid Chromatography (HPLC)
HPLC remains the gold standard for pharmaceutical cleaning validation.
It provides:
- High specificity
- Accurate quantification
- Product identification
- Excellent sensitivity
Suitable for:
- APIs
- Impurities
- Cleaning agents
- Potent compounds
Conductivity Testing
Conductivity is commonly used for detecting:
- Alkaline detergents
- Acidic cleaners
- Ionic residues
- Final rinse quality
Advantages include:
- Fast analysis
- Low cost
- Simple operation
However, it is not suitable for non-ionic organic residues.
Microbial Testing
Where microbial contamination is a concern, cleaning validation should also include microbiological assessment.
Typical tests include:
- Total Aerobic Microbial Count (tams)
- Total Yeast and Mold Count (TYMC)
- Specific pathogen testing
- Bioburden
- Endotoxin testing (where applicable)
Microbial limits should align with product and regulatory requirements.
Worked Analytical Example
Swab Sample
Area sampled:
25 cm²
Analytical result:
0.38 mg/swab
Acceptance limit:
0.50 mg/swab
Result: Pass
Rinse Sample
Final rinse volume:
20 L
Measured concentration:
0.02 mg/L
Total residue:
0.40 mg
MACO:
0.60 mg
Result: Pass
Sampling Flow Diagram
Equipment Cleaning
        │
        ▼
Visual Inspection
        │
        ▼
Risk-Based Sampling Plan
        │
 ┌───────────────┐
 │               │
 ▼               ▼
Swab Sampling   Rinse Sampling
 │               │
 └──────┬────────┘
        ▼
Sample Extraction
        ▼
Analytical Testing
(HPLC / TOC / Conductivity / Microbiology)
        ▼
Compare with Acceptance Criteria
        ▼
Pass / Fail Decision
        ▼
Cleaning Validation Report
Best Practices
✔ Sample worst-case locations.
✔ Validate recovery studies before execution.
✔ Use trained personnel for sampling.
✔ Label all samples clearly.
✔ Validate analytical methods.
✔ Trend analytical results.
✔ Investigate unexpected findings promptly.
✔ Maintain chain of custody for samples.
Common Mistakes
❌ Selecting only easily accessible sampling locations.
❌ Ignoring recovery efficiency.
❌ Using unvalidated analytical methods.
❌ Poor swab technique.
❌ Inadequate sample labeling.
❌ Delayed sample analysis.
❌ Failure to document sampling conditions.
❌ Not accounting for equipment surface area.
Key Takeaways
- Swab sampling provides direct evidence of surface cleanliness.
- Rinse sampling complements swab sampling, especially for CIP systems.
- Recovery studies are mandatory to demonstrate sampling efficiency.
- HPLC is the preferred analytical technique for specific residue quantification.
- TOC and conductivity provide rapid verification where appropriate.
- Sampling locations should be selected using a documented risk assessment.
Looking Ahead
In Part 3C, we’ll complete this article by covering:
- Cleaning Validation Documentation
- Validation Report Preparation
- Investigation of Cleaning Validation Failures
- Out-of-Specification (OOS) and Out-of-Trend (OOT) Handling
- Deviation Management
- CAPA
- Documentation Best Practices
- FAQs
- Regulatory References
- Key Takeaways
- Conclusion
- Internal Links to Part 4
These topics will help ensure your cleaning validation program is inspection-ready and fully compliant with global GMP expectations.
About Author
Ramesh Palav is a pharmaceutical manufacturing and quality professional with 20+ years of industry experience across pharmaceutical manufacturing, GMP, validation, qualification, quality systems, regulatory compliance, digital transformation and Pharma 4.0. Through Pharma Manufacturing Hub, he focuses on practical pharmaceutical knowledge, industry readiness, technology, compliance and professional development for students and pharma professionals.